

 EN
EN
 AR
AR CS
CS DA
DA NL
NL FI
FI FR
FR DE
DE EL
EL IT
IT JA
JA KO
KO NO
NO PL
PL PT
PT RO
RO RU
RU ES
ES SV
SV TL
TL IW
IW ID
ID LV
LV SR
SR SK
SK VI
VI HU
HU MT
MT TH
TH TR
TR FA
FA MS
MS GA
GA CY
CY IS
IS KA
KA UR
UR LA
LA TA
TA MY
MY

Mengapa Kecepatan Pemasangan Attachment Merupakan Item Biaya Nyata
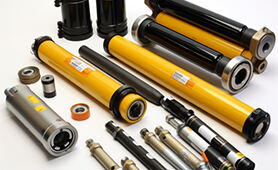
Mengganti attachment ekskavator dengan cara lama—melepas pin, menariknya secara manual, mengganti alat, memasang kembali, lalu mengencangkan ulang—memerlukan waktu sepuluh hingga dua puluh menit. Lakukan hal ini dua kali sehari di lokasi pekerjaan yang bervariasi, dan Anda telah menghabiskan empat puluh menit waktu operasional mesin tanpa hasil apa pun. Lakukan sepuluh kali sehari, sebagaimana dilakukan operator di beberapa aplikasi saluran dan perataan lahan, maka kerugian tersebut akan bertambah lebih cepat daripada yang biasanya diperhitungkan manajer lokasi.
Konektor cepat menghilangkan kebutuhan untuk melepas pin pemasangan secara manual, sehingga mengurangi secara signifikan waktu yang dibutuhkan operator ekskavator untuk berganti antar-peralatan. Pemecah hidrolik mendapatkan manfaat lebih besar dibandingkan kebanyakan peralatan lain, karena pemecah jarang menjadi satu-satunya alat yang digunakan di lokasi kerja. Urutan khas di lokasi kerja mungkin berjalan sebagai berikut: memecah pelat beton dengan palu, berganti ke bucket untuk membersihkan puing, lalu kembali menggunakan pemecah untuk memecah bagian berikutnya. Jika setiap pergantian memerlukan lima belas menit, maka kontraktor yang menggunakan konektor hidrolik penuh—yang mampu melakukan pergantian yang sama dalam waktu kurang dari dua menit—sedang menjalankan operasi yang secara mendasar berbeda, bukan sekadar versi yang lebih cepat dari operasi yang sama.
Namun demikian, tidak semua pekerjaan memerlukan konektor hidrolik penuh. Seorang kontraktor yang hanya mengganti pemecah sekali seminggu tidak perlu mengeluarkan biaya $4.000 untuk sistem hidrolik penuh. Solusi pemasangan yang tepat tergantung pada frekuensi pergantian, ukuran mesin, serta durasi waktu operasional di lapangan (ground time) yang bersedia diterima oleh operator.
Empat Rute Pemasangan — Analisis Perbandingan dan Kompromi
Tabel ini mencakup empat cara pemasangan breaker hidrolik ke ekskavator: pemasangan langsung dengan pin, kopling cepat manual, kopling bantu mekanis, dan kopling sepenuhnya hidrolik. Setiap kolom menunjukkan mekanisme pengoperasian, keuntungan praktis, serta hal-hal yang benar-benar Anda korbankan.
|
Metode Pemasangan |
Cara Pertukaran Dilakukan |
Keunggulan Utama |
Apa yang Anda Korbankan |
|
Pemasangan langsung dengan pin |
Tidak ada — breaker dipasang langsung ke dudukan lengan (dipper bosses) menggunakan pin |
Tidak menambah panjang lengan; gaya breakout maksimum tetap terjaga; konfigurasi paling ringan |
Memerlukan alat bantu, satu orang tambahan, serta waktu 10–20 menit per pertukaran; tidak praktis untuk pergantian yang sering |
|
Kopling cepat manual (penarik pin / kunci otomatis) |
Manual — operator keluar dari kabin sekali (untuk tipe kunci otomatis) atau dua kali (untuk tipe penarik pin) per pertukaran |
Biaya rendah (~USD 1.050 untuk kelas 3 ton); jumlah komponen lebih sedikit; lebih ringan dibandingkan sistem hidrolik |
Masih memerlukan keluar dari kabin; hanya praktis hingga sekitar 7 ton; tidak cocok untuk pertukaran frekuensi tinggi |
|
Mekanis (kunci bantu hidrolik) |
Sebagian besar dilakukan dari kabin; pemeriksaan akhir pin pengaman di permukaan tanah |
Dikendalikan dari kabin untuk sebagian besar urutan; cocok untuk kisaran berat menengah; biaya moderat |
Pin pengaman masih memerlukan konfirmasi di permukaan tanah; beberapa desain menambahkan kehilangan gaya lepas sebesar 3–5% |
|
Kopling sepenuhnya hidrolik |
Seluruhnya dikendalikan dari kabin melalui tombol atau tuas |
Pertukaran tercepat; tanpa waktu di permukaan tanah; memungkinkan 10+ pergantian per hari tanpa penurunan produktivitas |
Biaya dan bobot lebih tinggi; penambahan kecil pada panjang boom; katup pemeriksa satu arah diperlukan untuk mengantisipasi kegagalan selang |
Urutan Pemasangan yang Melakukannya dengan Tepat
Baik memasang secara langsung maupun melalui kopling, urutan pemasangan pemecah hidrolik mengikuti logika yang sama: koneksi mekanis terlebih dahulu, lalu selang — dan tidak boleh sebaliknya. Pasang dulu pin lengan, kemudian pin braket perlengkapan, dan terakhir selang hidrolik. Menghubungkan selang sebelum pin mekanis terpasang dengan aman dapat menyebabkan cedera serius pada orang atau kerusakan pada mesin jika perlengkapan bergeser.
Identifikasi port adalah langkah yang paling sering diabaikan oleh operator. Pemecah hidrolik dilengkapi port Masuk dan Keluar untuk saluran tekanan tinggi dan saluran kembali. Pastikan identifikasi port yang benar sebelum melakukan sambungan. Pemasangan selang terbalik merupakan kesalahan paling umum saat proses commissioning: pemecah tidak bergerak sama sekali atau bergerak secara terbalik, dan melacak masalah hingga ke selang yang tertukar membutuhkan waktu yang seharusnya tidak terbuang sia-sia. Selalu tutupi port hidrolik yang terbuka segera setelah tutup selang dilepas—tutupi port yang terbuka untuk mencegah masuknya benda asing. Kotoran yang masuk melalui titik sambungan bukanlah kebocoran yang terlihat; kotoran tersebut beredar secara tak terlihat dan secara bertahap merusak komponen pompa serta katup.
Sebelum mengoperasikan alat pemecah pada material keras, udara harus dikeluarkan terlebih dahulu dari sistem hidrolik dan membiarkan segel baru berfungsi secara optimal. Pada pemasangan baru, hal ini berarti melakukan siklus pemanasan: biarkan carrier menganggur dengan sirkuit alat pemecah dalam keadaan terbuka, operasikan kontrol attachment untuk mengalirkan oli melalui saluran tanpa memberi beban pada pahat terhadap material, serta pantau indikator suhu. Periksa bahwa aliran oli dan tekanan operasi berada dalam batas spesifikasi — pengaturan tekanan buang (relief pressure) harus berada 400–600 psi (27–41 bar) di atas tekanan operasi aktual. Jika selisih tekanan buang terlalu kecil, maka setiap lonjakan tekanan selama proses pemecahan akan terus-menerus membuka katup buang, sehingga menimbulkan panas berlebih. Jika tekanan kerja terlalu rendah, pahat tidak akan memiliki energi yang cukup untuk memecah material secara efisien.
Satu detail yang sering terlewatkan dalam pemasangan quick-coupler secara khusus: coupler menambah panjang boom. Setiap kali jari-jari ujung (tip radius) diperpanjang, gaya breakout berkurang. Pengorbanan ini memang nyata, namun sangat kecil dibandingkan peningkatan produktivitas akibat kemudahan mengganti attachment—penurunan gaya breakout aktual biasanya berkisar 3–5%. Beberapa kontraktor mengkonfigurasi ekskavator dengan boom yang lebih pendek saat memasang coupler untuk mengimbangi hal ini. Di lokasi kerja khusus yang dominan menggunakan breaker—di mana hammer beroperasi sebagian besar waktu kerja dan coupler jarang digunakan—penggunaan boom yang lebih pendek patut dipertimbangkan. Sedangkan di lokasi kerja campuran, fleksibilitas penggunaan attachment umumnya lebih bernilai dibanding penyesuaian geometri tersebut.