

 EN
EN
 AR
AR CS
CS DA
DA NL
NL FI
FI FR
FR DE
DE EL
EL IT
IT JA
JA KO
KO NO
NO PL
PL PT
PT RO
RO RU
RU ES
ES SV
SV TL
TL IW
IW ID
ID LV
LV SR
SR SK
SK VI
VI HU
HU MT
MT TH
TH TR
TR FA
FA MS
MS GA
GA CY
CY IS
IS KA
KA UR
UR LA
LA TA
TA MY
MY
Bússingin er ekki eyðilegur hlutur — þar til hún verður það
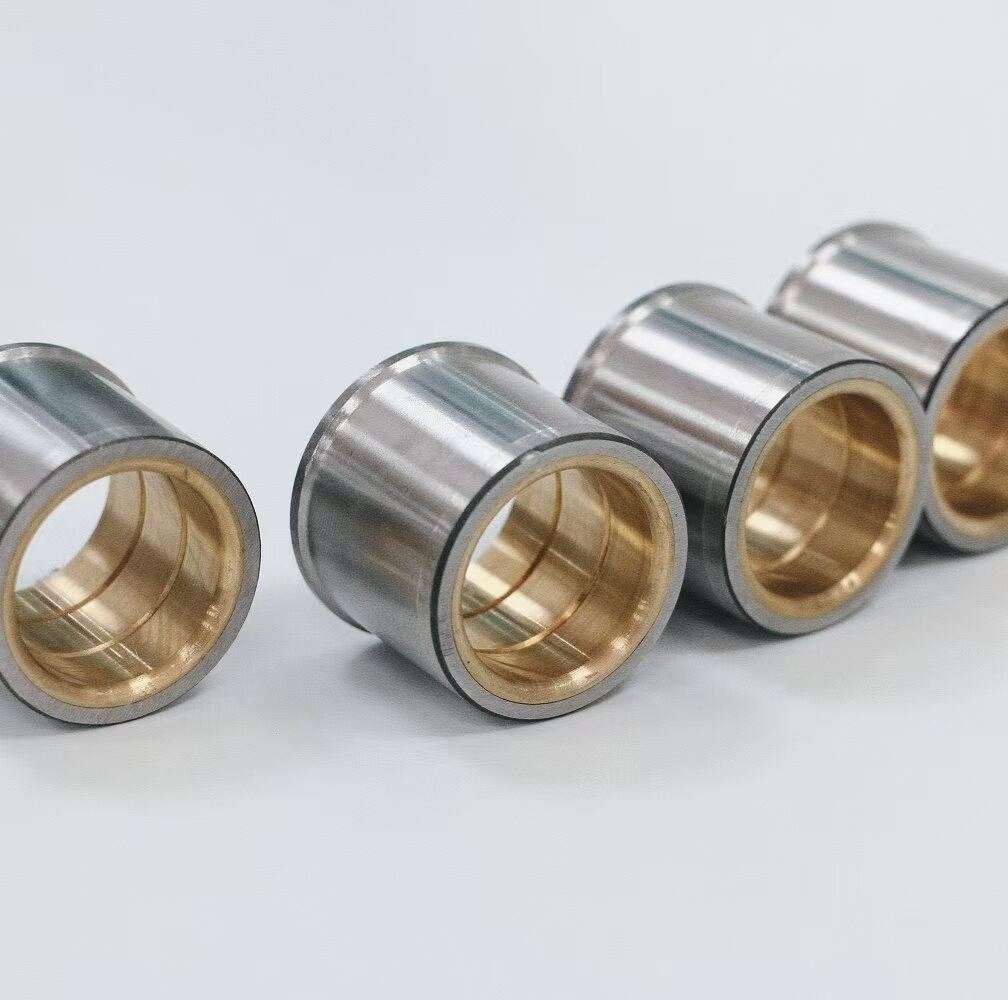
Hvert hydraulíska brotunarfæri inniheldur nokkra hluti sem slita með tímanum, en þeir slita ekki í sama hraða né valda sömu afleiðingum ef um þá er ekki hagsmunaðarlega gætt. Innri bússingin — steypuhringurinn inni í fremsta höfuðinu sem leiðir verkfærisaxlina við hverja áhrif — er ekki venjulega talin upp á daglegri viðhaldslista. Henni er ekki smurt beint. Slit hennar er ekki sýnilegt án þess að taka frá skerf. Og hún er hluturinn sem með mestri líkun veldur seundary-skemmdum á hlutum sem eru miklu dýrari að skipta út.
Nýjar gúmur halda 0,15–0,25 mm geislarupmæli við vinnuvélinn. Þegar þetta upmál náir 1,0 mm byrjar skornið að hallast undir álagi – ekki átökulega, en nægilega til þess að pistillinn slái ekki lengur beint á vinnuvélinn í endanum. Hver sláttur út af miðju sendir hliðstefndan kraft til pistilsins. Við 1,5 mm upmál fer skemmdin í röð: skörungur á pistilsyfirborði, hröðuð slíðrun á þéttunum vegna misstillingar og að lokum skemmd á borðinu í fremsta höfuðinu sjálfu. Gúmurinn kostar um það bil 50–150 dollara eftir gerð. Pistillinn sem hann verndar kostar fimm til tíu sinnum meira. Að bíða þar til upmálið er orðið 1,5 mm til að skipta út við 1,0 mm er ekki varúð. Það er dýrasta viðhaldsákvörðunin á skorninu.
Greiðsluatriðið við svæðismælingu sem krefst ekki fullrar afþreyingar er einfalt: taktu 3/16-tommu (4,8 mm) bor og reyndu að skjúfa það á milli verkfærisaxilsins og bussingsborðsins með ísskorninu á stað. Ef það fer inn, hefur bilunin yfirleitt náð þeim marki sem er ekki lengur í lagi fyrir notkun. Mælingin tekur þrjátíu sekúndur. Flestir starfsfólk sem læra hana nota hana við hverja skiptingu á ísskorni. Flestir starfsfólk sem ekki vita um hana skipta bussingum aðeins þegar ísskornið vafar augljóslega – sem er 0,5 mm yfir rétta skiptistöðu.
Fjórir slitahlutir — Hraði, Rás og Kaskadí
Fjórir eftirtaldir viðbótahlutir eru raðaðir eftir því hvaða áhrif dregur úr frestun á skiptingu, ekki eftir tíðni slita. Dálkurinn „Kaskadí“ lýsir því hvað brotnar næst ef slitaður hlutur er ekki skiptur á réttan tíma.
|
Aðbúnaður |
Dregin á |
Skilyrði fyrir skiptingu |
Kaskadí ef hunsað |
|
Innri bussing (verkfæragátt) |
Hæst – 600–1.200 fram- og tilbakaferðir á mínútu gegn axlinu á 200°C snertitemperatúru |
Radíalhlæða ≥ 1,0 mm (mæla með hliðarmáli eða 3/16" borbiti sem er skoruð á milli tólins og bussingsborðs) |
Þrengd bussing leyfir ílátinu að kantast; pistillinn slær á horni; skörungur á andlitssíðu pistils byrjar innan klukkutíma — og breytir $50 vinnu á bussingu í $500+ endurbyggingu á pistli |
|
Oddi ílátis |
Meðalhár til hár, eftir því hvað bergið er harðara og eftir starfsaðferð notandans; gránít eyðir oddum 3–4 sinnum hröðar en kalksteinn |
Sýnilegur sveiflunarefni, afhringing utan við oddaprófíls eða stækkanir í rás fyrir festipinnann; ekki reyna að endurskarpna — breyttur lögunarmynd breytir harðleikasvæðinu |
Dullur oddi flytur orku óaðstæðulega — fleiri slag á hverja steinblokk, meiri slitage á bussingunni, meiri hiti í hydraulíkolíunni; seinkuð skipting kosta meira en ílátið |
|
Ofnæmisþéttun (framanverandi rýrnir) |
Meðalhár — eykst markvart í dustugum eða rýnandi umhverfi; dust blandinn við smurr myndar rýnandi pasta |
Sýnilegar sprungur eða harðnun á þéttunarbrúninni; smurrhúð birtist ekki lengur við neðri bussinguna í rekstri |
Slípilagur pasta fer inn í fremsta höfuðið; slípning á innri buðu eykst strax um 2–3 sinnum; næsta skipti sem buðan er skipt er helminguð |
|
Halda-pinnar og halda-ráðir |
Lág í venjulegum notkun; hraðar við rangt notkun á skífusnúði sem lykil, eða við álag út af ásnum |
Útvíkjun á pinnagrunni á skífusnúðinum (sýnileg sem vídkaður slitur); halda-ráðir bentar eða með fínar rissur |
Laus halda gerir því kleift að skífusnúðinn hoppí á tóm-sprengingum og sendi óstýrða hliðráða á borða í fremsta höfuðið – loksins brotnun á fremsta höfuðinu |
Smurning er ekki aðskilin frá slípningu buðunnar — hún er breytanleg stærð
Innri gúmmíhylkin slitas af því að verkfærisaxlinn glísar á móti því 600–1.200 sinnum á mínútu við snertingartemperatúr sem geta verið hærri en 200 °C. Skornisdegi heldur áfram hálfvöku filmu milli þessara tveggja stálflatna. Venjuleg bíladegi gerir það ekki. Hún verður vöku við starfshitastigi skornisins, fer út úr bilinu innan mínútna og skapar beina metalla-að-metall-samband. Þá slitas hylkin 2–3 sinnum hröðar en venjulega. Aukakostnaðurinn fyrir skornisdegina fram yfir venjulega degina er um það bil 15 dollara á rör. Aukin notkunartími hylkinsins — mældur í hundruðum starfshárs — er ekki jafnvel í nágrenni við þennan kostnað.
Rétt smurrunaraðferð er líka mikilvæg. Notið smurringsmassu með hjólinu þvítt í holuna — tól á álagi eða hjólið ýtt upp handvirkt. Pumpið þar til ný smurringsmassa birtist við rúddinna í kringum tólið. Sú sýnilega útflæðing staðfestir að bilinu milli tólsins og hulksins sé fullt. Ef smurringsmassan er sett á með hjólinu í útstrektu stöðu, safnast hún saman bakvið efri hluta stöngvarinnar í staðinn fyrir smurrunarsvæðið milli hulksins og tólsins. Hulkið vinur þá án smurrings. Starfsmaðurinn beitti smurringu rétt samkvæmt öllum sýnilegum tilvísunum en valdi samt hröðuðum slitage.
Skipta á bussingu er í raun einfalt á flestum brotahugbúnaðarvélum: fjarlægðu festipinnana, dragðu út skerðilinn, pressaðu út gamla bussinguna með mjúkri slöngu eða rétta útþrengjupinnan, pressaðu nýju bussinguna rétt inn, og settu saman aftur. Verkið tekur 20–40 mínútur með grunnhandverkfæri. Einasta leiðin til að það verði flókið er ef notaða bussingan hefur verið í notkun lengi nóg til að skera í borðsætið – þá þarf fremri höfuðhlutinn að vinnast á sníðumskoðun eða skipta út. Þessi aðstæður eru alveg koma af hæfilegum. Skiptið út við 1,0 mm. Ekki við 1,5 mm.