

 EN
EN
 AR
AR CS
CS DA
DA NL
NL FI
FI FR
FR DE
DE EL
EL IT
IT JA
JA KO
KO NO
NO PL
PL PT
PT RO
RO RU
RU ES
ES SV
SV TL
TL IW
IW ID
ID LV
LV SR
SR SK
SK VI
VI HU
HU MT
MT TH
TH TR
TR FA
FA MS
MS GA
GA CY
CY IS
IS KA
KA UR
UR LA
LA TA
TA MY
MY
The maintenance reflex when a drifter starts vibrating more than it should is to reduce percussion pressure. Sometimes that fixes it. More often it masks the symptom while leaving the actual source—a worn guide sleeve, a depleted accumulator, a string resonance condition—to continue degrading the housing structure and the operator's exposure level. The distinction matters because percussion energy reduction has a real cost: less energy per blow means more blows per meter and slower advance. If the vibration came from a mechanical source that wasn't addressed, reducing percussion pressure bought time without buying anything else.
Vibration in a hydraulic rock drill system is multi-frequency and multi-source by nature. The percussion circuit generates the fundamental percussion frequency; the reflected stress wave from the drill string arrives back at the drifter body at a frequency determined by string length and acoustic velocity; the rotation motor adds its own harmonic; and the mounting system—boom arm, feed beam, anti-vibration isolators—amplifies or attenuates each component depending on how it relates to structural resonance frequencies. An operator noticing 'the drill is vibrating more than before' is observing the sum of all of these, not a single identifiable source.
Source Identification Before Remedy
The practical diagnostic sequence starts with the quickest check, not the most sophisticated. Check accumulator pre-charge first—depressurize the system completely, connect the charging gauge, read the nitrogen pressure. If it's more than 10% below specification, recharge and test again before investigating anything else. An underpressured accumulator produces pressure oscillation in the percussion circuit that drives irregular piston loading and characteristic saw-tooth vibration pattern in the housing. This is also the most common single-cause vibration fault and the cheapest to fix.
If pre-charge is correct, check guide sleeve shank wobble by hand with the system depressurized. Apply lateral force at the front of the shank and feel for movement. Zero perceptible play is the normal state for a new or serviceable guide sleeve. Movement beyond 0.3 mm is early wear; beyond 0.4–0.5 mm is at replacement limit. A worn guide sleeve produces 100 Hz vibration—twice the percussion frequency—from the lateral shank impulses on each return stroke, combined with secondary torsional excitation at the rotation motor as the off-axis shank load transfers through the chuck assembly.
The Four Vibration Sources and How to Distinguish Them
Accumulator pre-charge loss produces a globally elevated, somewhat irregular vibration with a periodic pressure fluctuation visible on the gauge. The sound character changes: percussion becomes slightly uneven in rhythm rather than uniform. The distinctive test: if the vibration is worse at the start of a drilling cycle and stabilizes after the first 3–5 seconds, the accumulator is partially functional but pre-charge is low. Full discharge symptoms produce irregular percussion from the first blow.
Guide sleeve wear produces a fine, rapid 'chatter' superimposed on the fundamental percussion rhythm—identifiable by its higher frequency and its concentration at the front housing and chuck area rather than the rear housing. Operators who work with the same drifter daily often describe it as 'the front end feels loose.' The diagnostic confirmation is the hand-force lateral test on the shank combined with percussion sound character: worn sleeve produces both perceptible lateral play and a slightly different, less crisp percussion sound from the piston mis-strike.
Drill string resonance produces vibration that's most severe at specific hole depths—it appears and intensifies as rods are added, then may reduce or shift character at the next rod addition. The physical mechanism: as string length increases, the fundamental resonance frequency of the rod system decreases toward the percussion frequency. When they approach each other, the reflected stress wave from the previous blow returns to the shank in phase with the current outgoing blow, reinforcing the housing stress cycle rather than being absorbed. The fix is adjusting percussion frequency via the regulating plug to move the operating point away from the resonance condition—not changing percussion pressure.
Blank firing produces an abrupt vibration increase with a distinct sound change when the bit loses rock contact—sharper, higher pitch, and significantly louder. This is the most mechanically damaging vibration source because the housing absorbs the full return energy without the rock face absorbing any of it. Auto-stop systems that detect blank firing within 200–500 ms via pressure-pattern analysis are the primary protection on modern jumbos. Field measurements at a granite quarry site showed that passive vibration reduction measures combined (isolated handle plus auto-tuning vibration absorber) reduced hand-arm vibration from 34–41 m/s² to approximately 11.6 m/s²—but those measures work in concert with, not as a substitute for, addressing the mechanical source.
Vibration Diagnosis and Solution Reference
|
Vibration Character |
Most Likely Source |
Quick Diagnostic Test |
Correct Fix |
|
Irregular rhythm, gauge saw-tooth |
Accumulator pre-charge low |
Check N₂ with system depressurized |
Recharge to specification; inspect diaphragm |
|
Fine front-end chatter |
Guide sleeve worn |
Hand lateral shank force—>0.3 mm = worn |
Replace guide sleeve; check front seals |
|
Peaks at specific depth |
Drill string resonance |
Add or remove one rod—does char. change? |
Adjust percussion frequency via regulating plug |
|
Sudden increase, loud |
Blank firing |
Loss of bit-rock contact visible/audible |
Auto-stop function; operator vigilance |
|
Rotation-side rattle |
Rotation bearing degraded |
Percussion off, rotation only—listen |
Replace rotation motor bearing |
|
General rise, warm drain |
Percussion seal bypass |
Return oil temp >80°C with normal gauge |
Replace percussion seal kit; inspect bore |
|
Periodic boom arm shake |
Anti-vib mount hardened |
Compress mount rubber by hand—stiff? |
Replace anti-vibration mounts |
Structural Reduction: Isolators and Mount Condition
Anti-vibration mounts between the drifter and feed beam are rubber-metal isolators designed to attenuate high-frequency vibration while transmitting the axial feed force the percussion needs. The rubber compound hardens with age, heat cycles, and oil contamination—a mount that passed its first-year inspection may be 40% stiffer three years later without any visible external change. The test: compress the rubber section of each mount by thumb pressure. New and serviceable mounts yield noticeably; hardened mounts feel nearly rigid. Stiff mounts transmit high-frequency vibration directly to the boom arm structure rather than attenuating it, increasing structural fatigue at boom pivot joints and bushings.
Boom joint bushing wear compounds the mount condition problem. A worn bushing allows the boom arm to micro-oscillate at the percussion frequency, creating a cyclic load on the pin that eventually produces pin wear, structural cracking at the weld zone, and operator vibration exposure through the cabin mounting. Checking bushing clearance at each drifter service—not just at the jumbo's annual service—catches this before the cost of the failure is a cracked boom weld rather than a bushing replacement.
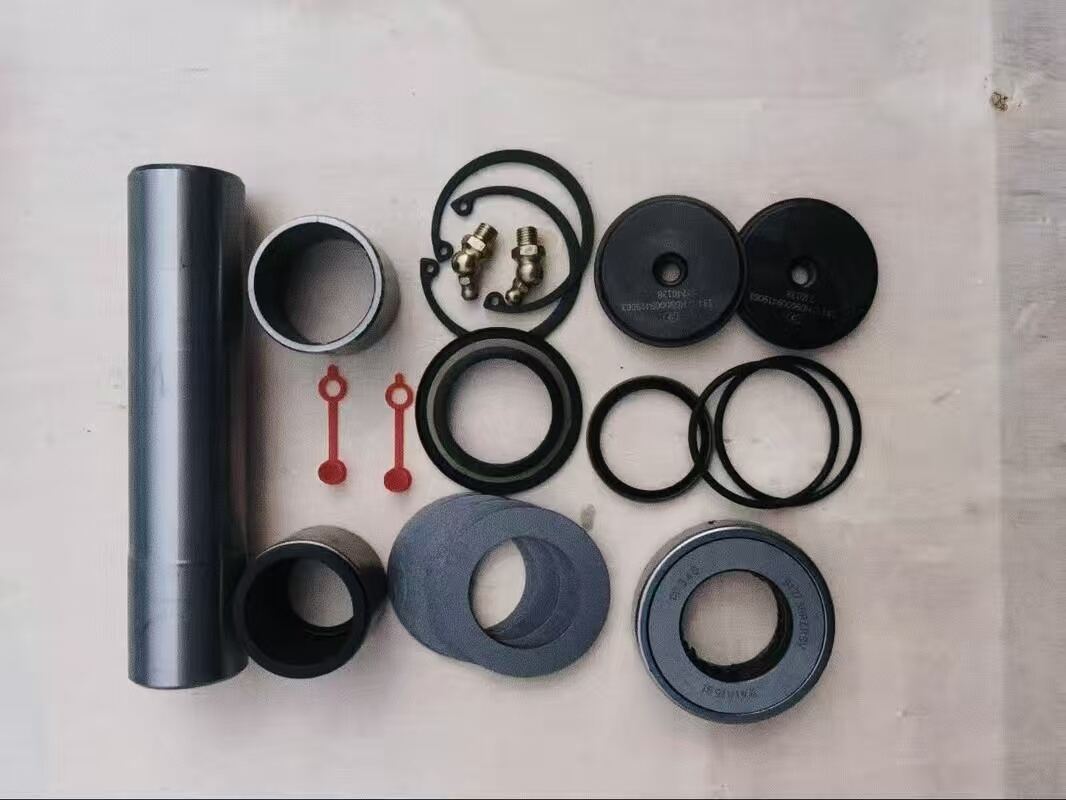
Seal condition directly affects vibration: a percussion seal bypass that reduces the effective pressure differential on the piston produces shorter, incomplete stroke cycles at the same gauge-set pressure. The incomplete strokes produce a different vibration frequency—a sub-harmonic of the normal percussion frequency—that experienced operators sometimes describe as the drill 'missing beats.' The fix is the percussion seal kit, not parameter adjustment. HOVOO supplies seal kits for all major drifter platforms in PU and HNBR compounds. Full references at hovooseal.com.
