33-99No. Mufu E Rd. Gulou District, Nanjing, China [email protected] | [email protected]
33-99No. Mufu E Rd. Gulou District, Nanjing, China [email protected] | [email protected]

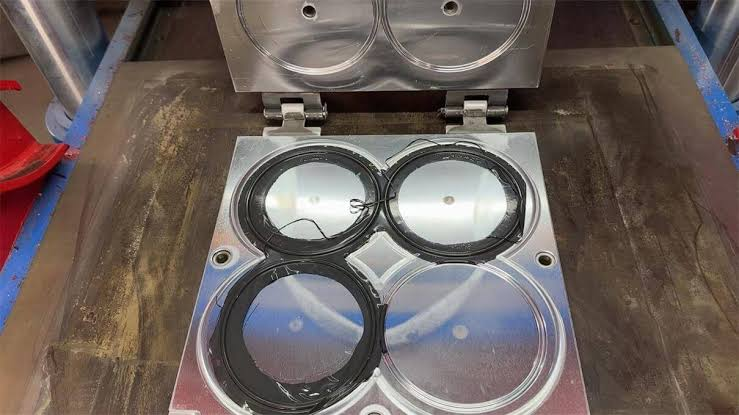
A qualified O-ring is defined starting from the formulation, made into compound during mixing, cured into shape in the mold, has its risk points removed through trimming, post-cure, cleaning and inspection, and finally has batch traceability proven at shipment — this ring came from where, made by whom, and how. The general industry process flow includes formulation/mixing, pre-forming, curing, trimming, post-processing and inspection; common molding methods include compression molding, injection molding, and transfer molding; key process parameters include mold temperature, pressure, and cycle time. Curing is essentially the process by which heat and a cure system cause the rubber molecules to form a crosslinked network, thereby gaining strength, elasticity, heat resistance, media resistance, and dimensional stability.
Raw material confirmation → formula weighing → mixing → compound inspection/holding → pre-form → compression or injection molding → curing → demolding → trimming → post-cure → cleaning/drying → appearance and dimensional inspection → performance sampling → packaging labeling → warehousing/shipment → batch traceability.
Key Field |
Position in Process |
Core Purpose |
Mixing |
Raw rubber to compound |
Disperse raw rubber, filler, oil, additives, and curatives evenly, form moldable compound. |
Pre-form |
Compound to preform blank |
Control the charge weight, shape and cleanliness of each mold. |
Compression molding |
One molding method |
Suits multiple specs, small/medium batch, complex spec or standard-part production. |
Injection molding |
One molding method |
Suits larger batch, automated, stable-quality production. |
Curing |
Core reaction of molding |
Forms the crosslinked structure, decides hardness, elasticity, compression set and media resistance. |
Trimming |
Post-demold |
Removes flash, loose ends, separates multi-cavity rubber, protects the sealing face. |
Post-cure |
Post-trim or per product requirement |
Further stabilizes properties, releases volatiles, improves compression set etc. |
Cleaning |
Post post-cure |
Removes powder, release agent, trim scrap, oil stain or particles. |
Inspection |
Whole process |
Confirms dimension, appearance, hardness, physical properties and batch consistency. |
An O-ring's performance is first not decided by the mold, but by the formula. A typical formula composition includes:
Formula Component |
Function |
Impact on Finished Product |
Base polymer: NBR, HNBR, EPDM, FKM, VMQ, FFKM etc. |
Base compound |
Decides oil resistance, water resistance, high/low temperature resistance, fuel resistance, chemical resistance. |
Carbon black, silica, mineral filler |
Reinforcement/filling |
Affects hardness, tensile strength, wear resistance, dimensional stability, cost. |
Plasticizer/processing oil |
Improves processability and low-temperature flexibility |
Affects flow and defect-formation risk. |
Anti-aging agent, antioxidant |
Improves heat/aging resistance |
Affects service life and warranty period. |
Curatives, accelerators, peroxides, auxiliary crosslinkers |
Build crosslink network |
Decides curing speed, compression set, media resistance. |
Release agent/processing aid |
Improves processing and demolding |
Improper amount can cause finished-product contamination or bonding failure/customer complaint. |
ASTM D2000 is a commonly used material classification system in the rubber industry, covering vulcanized rubber material classification, and establishes material codes by hardness, curing conditions, heat-resistance grade, oil-swell characteristics, and other criteria; customer specifications commonly reference an ASTM D2000-style material code to define hardness, tensile strength, aging, and compression set requirements.
Factory audits often ask: whose responsibility is the formula and does the audit team have formula authority — the audit team generally does not need to see the specific ingredients.
Audit Point |
Compliant Control |
Audit Evidence |
Formula authority |
Formula controlled by technical/QC batch, production floor may not modify at will |
Formula version, ECN/change record, batch approval record |
Raw material batch |
Every incoming raw material must have supplier batch, COA, incoming inspection |
Raw material label, COA, incoming inspection record |
Weighing accuracy |
Small material, curatives, promoters must be weighed precisely |
Electronic scale calibration record, weighing sheet, double-check signature |
Error prevention |
Similar powders, similar rubber types, similar hardness distinguished |
Color coding, code, isolation, dual verification |
Change management |
Raw material, supplier, formula ratio, mixing process changes must be verified |
PPAP/FAI, trial-production report, performance comparison |
Confidentiality and consistency |
Customer-approved formula cannot be substituted privately |
Formula encoding, customer-dedicated spec number, controlled documents |
Sales can express this to the customer this way: we don't sell "a ring of the same size," we sell a ring reproduced under the same formula, the same process window, and the same inspection standard — dimension is only appearance; formula and curing are the source of performance.
Mixing is the process of turning raw rubber, filler, oil, additives and curatives into uniform compound. O-ring production commonly uses an internal mixer or open two-roll mill, or a continuous mixing device; the mixing goal is to fully disperse filler and additives while avoiding overheating, scorching or local uneven formulation. Industry material also refers to two-roll mills, twin-screw mixers and continuous mixing equipment as common mixing equipment; the mixing process pays particular attention to material batch consistency, mixing time, temperature, and addition sequence.
Stage One: masterbatch. Raw rubber, carbon black, silica, filler, oil, anti-aging agent etc. are mixed in, the goal is even dispersion and appropriate plasticity.
Stage Two: final batch. Curatives, accelerators, or peroxide systems are added, final-batch temperature must be strictly controlled, because too-high temperature causes premature reaction, i.e. scorch risk.
Control Point |
Why It Matters |
Loss of Control Consequence |
Charging sequence |
Affects dispersion and reaction safety |
Poor dispersion, hard spots, unstable performance |
Mixing temperature |
Prevents premature curing and volatilization loss |
Compound early cure, poor flowability, defects |
Mixing time |
Ensures dispersion uniformity |
Under-mixing: particles/white spots; over-mixing: degradation or scorch risk |
Discharge temperature |
Judges whether the process can safely enter storage |
Temperature bias too high shortens storage life |
Batch weight |
Affects formula ratio accuracy |
Hardness, density, performance drift |
Compound holding time |
Allows stress and temperature to homogenize |
Insufficient holding causes unstable dimensions; too long causes scorch risk |
Compound inspection |
Judges whether it can be fed into production |
Unqualified compound cannot flow into molding, causing batch rejection |
Inspection Item |
Purpose |
Mooney viscosity |
Judges processing flowability and batch-to-batch stability |
Cure curve MDR/ODR |
Judges cure time, optimal cure time, crosslink degree |
Hardness test piece |
Predicts finished-product hardness |
Specific gravity |
Judges filler, oil, or formula deviation |
Dispersion |
Judges carbon black/silica dispersion quality |
Appearance |
Checks impurities, scorch particles, white spots, contamination |
Auditors may probe: which mixing batch corresponds to a given finished-product batch number? Does that mixed compound's MDR curve, hardness, specific gravity qualify? How are non-conforming compounds isolated?
Pre-forming is the important step of cutting, extruding, or calendering the mixed compound into pre-fitted mold-charge blanks. It is not simply "cutting rubber cord" — it decides the risk of mold underfill, flash, air entrapment, and missing rubber.
Pre-Form Type |
Applicable Situation |
Rubber cord |
Common for compression-molded O-rings |
Rubber sheet/block |
Suits some large-batch or special-mold products |
Ring blanks |
Suits large sizes or products needing high splicing uniformity |
Injection-machine strand/pellets |
Suits injection-molded feedstock |
Automated cut feed |
Suits products needing high batch, weight consistency |
Control Point |
Qualified Manifestation |
Loss-of-Control Risk |
Piece/mold-charge weight |
Meets mold cavity fill without overcharge |
Underfill causing missing rubber, overcharge causing excess flash thickness |
Blank dimension |
Can be stably placed in the mold cavity |
Deviation, jamming, mixed-material placement risk |
Blank cleanliness |
No ash, no metal chips, no foreign matter |
Surface contamination, cross-contamination risk |
Batch isolation |
Different compound, hardness, color kept separate |
Mixed material, wrong material |
Usage-time limit |
Used per FIFO by charge-time |
Scorch, decreased flow |
Operating environment |
Table, tools, turnover box clean |
Particle, oil, dust contamination |
This can be explained to the customer as: the goal of pre-forming is to let every mold cavity receive "the correct weight, correct shape, correct batch" compound. If the charge is wrong, later curing is hard to remedy.
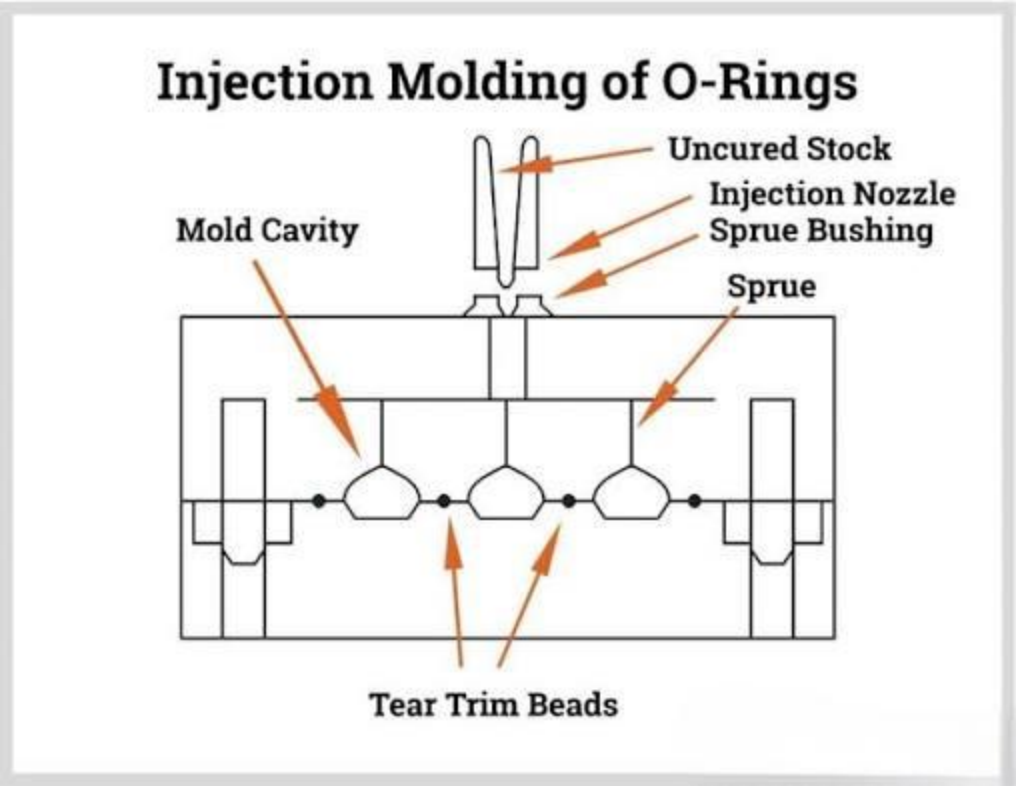
An O-ring's molding method is not just one type. Compression molding and injection molding are usually a select-one, or configured by product family — not all products go through both processes at the same time. Industry material summarizes the compression, injection, and transfer molding processes generically as common O-ring molding methods; compression molding places a pre-metered amount of compound into an opened mold, then closes the mold with heat and pressure; injection molding uses equipment to inject compound into a closed, precise, and high-batch mold.
Process: preformed compound → manual or automatic charging → mold close → apply heat and pressure → cure → mold open → demold.
Advantage |
Explanation |
Strong adaptability |
Applies to small batch, multi-spec, large size, non-standard parts |
Relatively low mold cost |
Suits customer development, trial production and multi-variety orders |
Good adaptability to compound |
Suits compound with poorer flowability |
Intuitive process |
Easy for audit and customer visit to understand |
Risk |
Typical Cause |
Excessive flash thickness |
Overcharge, mold wear, insufficient clamping pressure |
Missing rubber |
Undercharge, poor compound flow, poor venting |
Bubbles |
Blank entraps air, poor mold venting, unsuitable closing speed |
Off-center/misalignment |
Charge placement inaccurate, mold positioning issue |
Obvious parting line |
Mold precision, poor trim control |
Process: compound enters the injection barrel → plasticize/preheat → inject into a closed mold → hold pressure → cure → mold open → demold.
Advantage |
Explanation |
Stable cycle |
Suits large-batch production |
Consistent charge |
Metered by equipment, reduces manual-charging fluctuation |
High automation degree |
Can reduce human contamination and human-induced variance |
Suits multi-cavity molds |
Favorable for per-unit cost and consistency control |
Better flash controllability |
Provided mold, locking force and venting design are well done |
Risk |
Typical Cause |
Scorch/burn |
Compound sits idle in barrel too long or temperature too high |
Flow marks/knit lines |
Runner design, injection speed, compound flowability issue |
Short shot |
Insufficient injection pressure, poor venting, viscosity deviation |
Batch defects |
Parameter setting error and quick reproduction into mass production |
High mold cleanliness requirement |
Residual flow material, contamination affects continuous production |
It can be said this way: for multi-spec, small-batch, special-size products, compression molding is more flexible; for large-batch, stable-order, automation-required products, injection molding is more efficient and consistent. The choice of molding method isn't just about which is "higher-end" — it depends on product size, annual volume, and quality targets, and cost objectives.
Curing is not "cooking the rubber done" — it is under controlled temperature, pressure and time, letting the rubber molecular chains form a crosslinked network. This crosslink network decides the O-ring's elastic recovery, compression set, tensile strength, heat aging, and media resistance. Industry material also points out curing triggers a crosslinking reaction via heat, giving the rubber strength, elasticity and environmental resistance.
Parameter |
Effect |
Too Low/Insufficient |
Too High/Excessive |
Temperature |
Decides reaction speed and flow |
Undercure, surface hairiness, insufficient strength |
Overcure, aging, brittleness, dimensional abnormality |
Time |
Decides crosslink sufficiency |
Compression set poor, unstable performance |
Low production efficiency, degraded performance |
Pressure |
Ensures fill, venting, density |
Missing rubber, bubbles, parting-line gap |
Flash, mold overload, local stress |
A good factory doesn't rely on experience "press for how many minutes," but establishes a curing window.
Item |
Explanation |
MDR/ODR curing curve |
Judges scorch time, t10, t90, maximum torque, crosslink degree |
Mold temperature distribution |
Confirms each zone's temperature is consistent |
Product thickness/cross-section |
Larger cross-section, slower heat transfer, generally longer cure time |
Compound type difference |
NBR, EPDM, FKM, VMQ, FFKM cure system and window differ |
Mold cavity count |
Multi-cavity molds need to focus on inter-cavity consistency |
Actual finished-product verification |
Verify process with hardness, tensile, compression set, dimensional stability |
Defect |
Possible Cause |
Impact on Sealing |
Undercure |
Too short a time, too low a temperature, insufficient curative |
Poor elasticity, high compression set, short life |
Overcure |
Too long a time, too high a temperature, repeated re-work reheat |
Brittle, cracking, abnormal hardness |
Bubble |
Insufficient venting, high compound entrapped-air/volatiles |
Leak path, explosive decompression risk |
Delamination |
Poor mixing, contamination, compound held too long |
|
Mold-mark/press mark |
Mold damage, foreign matter too much |
Insufficient dimension, poor sealing, use-time abnormal |
Auditors can focus on: are cure parameters recorded per work instruction, is equipment temperature calibrated, does actual production record match the process card, is anomaly batch frequency abnormal, and is rework accepted.
Demolding looks simple, but directly affects appearance and micro-crack risk.
Control Point |
Requirement |
Demold timing |
After curing completes, open the mold, avoid pulling damage under undercure state |
Demolding method |
Avoid using sharp tools that could scratch the sealing face |
Demold agent |
Amount controlled, prevent residue affecting appearance or customer assembly |
Mold cleaning |
Mold buildup causes pockmarks, dents, missing rubber |
Product cooling |
Avoid pulling into stretch deformation under high-temperature state |
A common problem: product is still hot right at demolding — if the operator over-pulls, it can lead to hidden cracks, permanent deformation or roundness abnormality.
After compression or injection molding, an O-ring usually generates flash, extra scrap or spillover at the parting line, gate, and venting positions. Trimming's goal is not "looking cleaner," but ensuring the sealing face and fit surface dimensional boundary is not disturbed by flash. ISO 3601-3:2005 is one of the O-ring quality acceptance standards, whose official statement defines and classifies surface defects and their maximum allowable values; this standard's most recent confirmation is in 2021 and remains currently in force.
Trim Method |
Applicable Situation |
Risk |
Manual trim |
Large batch, low batch, special part |
Human variance, cutting, low efficiency |
Mechanical drum trim |
Small/medium batch, batch parts |
Excessive grinding, edge rounding |
Cryogenic trim |
Small size, multi-piece batch |
Improper embrittlement condition may damage the product |
Grinding wheel/knife trim |
Special structure or large size |
Over-trimming, surface scratches |
Automated trim |
Large batch, regular product |
Equipment parameters must be stable |
Item |
Compliance Requirement |
Flash height |
Meets customer drawing, internal standard or ISO 3601-3 etc. acceptance criteria |
Parting line |
Does not affect sealing, does not form a leak path |
Sealing face |
No cuts, missing rubber, cracks, dents |
Gate residue |
Does not exceed the specified limit, does not affect assembly |
Surface cleanliness |
No rubber film, dust, foreign matter |
Consistency |
Same-batch product trim state consistent |
Loss-of-Control Situation |
Consequence |
Excessive flash |
Assembly jam, uneven compression, sealing failure |
Over-trim |
Cross-section undersized, notch, strength decrease |
Cut damage to sealing face |
Leak point formation |
Trim scrap residue |
Contaminates customer system, e.g. hydraulic, fuel, medical/cleanroom system |
Coarse parting line |
Accelerated wear in dynamic seals |
For auditors, this can be explained as: trimming is not an end-of-line cosmetic step, it is a sealing function control point. Once an O-ring's sealing face is cut, subsequent cleaning and inspection cannot restore its function.
Post-cure is a secondary heat treatment applied after demolding and initial processing, putting the O-ring in an oven under specified temperature, time and ventilation conditions. Not all materials or all orders necessarily need post-cure, but for FKM, VMQ, and some high-performance materials or customer-specified products, post-cure is often a key process step.
Purpose |
Explanation |
Complete crosslinking |
Further stabilizes the crosslink structure for some systems |
Reduce volatiles |
Releases residual small molecules, reaction byproducts or volatile groups |
Improve compression set |
Improves the long-term compression rebound retention capability |
Stabilize dimension and hardness |
Reduces post-service performance drift |
Improve heat/media performance |
Especially for some high-temperature or chemical-media applications |
Public industry material also links post-cure of FKM O-rings to improved mechanical properties, tear strength, and compression set performance.
Control Point |
Requirement |
Temperature curve |
Set per material and customer specification, temperature rise cannot be arbitrary |
Holding time |
Calculated from when the product reaches the specified temperature |
Oven ventilation |
Volatiles need to be exhausted, avoid secondary contamination |
Load quantity |
Cannot be piled too dense, otherwise heat is uneven |
Batch isolation |
Different materials, different batches, different customer numbers kept separate |
Record |
Oven number, temperature curve, start/end time, operator, batch number |
Verification |
Post-post-cure hardness, dimension, compression set or volatiles requirement |
Problem |
Impact |
Insufficient temperature/time |
Volatile residue, unstable performance |
Excessive temperature/long time |
Aging, hardness rise, embrittlement, shrinkage |
Insufficient ventilation |
Odor, precipitate, surface contamination |
Batch stacked randomly |
Traceability broken, cross-contamination risk |
No temperature record |
Audit cannot prove process was effective |
Sales can explain to the customer: post-cure is a second heat-receiving treatment for the demolded O-ring, and the purpose is not rework — it's to make material properties more stable, especially suited to applications with high-temperature, low-volatile, low-compression-set, or high-cleanliness requirements.
O-rings may carry compound residue, particles, demold agent, oil stain, oven residue, or packaging particles during trimming, post-cure, and turnover. Cleaning's goal is for the product to reach the specified cleanliness before delivering to the customer.
Cleaning Method |
Applicable Situation |
Water wash/neutral cleaning agent |
General industrial O-rings |
Ultrasonic cleaning |
Products with higher particle and residue requirement |
Deionized water rinse |
Medical, electronic, cleanroom requirements |
Solvent cleaning |
Special oil stain or special material, but compatibility must be verified |
Centrifugal/hot-air drying |
Quick drying, prevents water marks and secondary contamination |
Cleanroom pre-packaging cleaning |
High-cleanliness applications |
Control Point |
Loss-of-Control Consequence |
Cleaning-media compatibility |
Swelling, cracking, surface whitening |
Cleaning solution concentration |
Cleaning insufficient or residue exceeds limit |
Cleaning time |
Particle residue or material damage |
Drying temperature |
Over-heating causes aging, too low causes water residue |
Turnover container |
Cleaned product re-contaminated |
Operating environment |
Clean product contaminated by general environment |
Cleaned O-rings should not be directly dumped back into a general turnover box. For high-requirement customers, the turnover, inspection and packaging environment after cleaning is also within the process-control scope.
Inspection Level |
Inspection Content |
Purpose |
Incoming inspection |
Raw material COA, appearance, batch, validity, necessary properties |
Prevent wrong raw material from entering production |
In-process inspection |
Compound, pre-form, first article, patrol inspection, curing parameters, trim state |
Prevent batch defects from expanding |
Final inspection |
Dimension, appearance, hardness, performance sampling, packaging label |
Confirm the finished product is deliverable |
ISO 3601-1:2012 defines the internal diameter, cross-section, dimensional tolerance and dash number of O-rings for fluid power dynamic systems; the official page shows this standard was reconfirmed in 2022 and remains currently in force; this class of standards is commonly used as the basis for dimensional and grouping communication.
Inspection Item |
Method/Tool |
Focus Point |
Inner diameter ID |
Caliper, ring gauge, optical measurement |
Whether the drawing tolerance is met |
Cross-section CS |
Caliper, projector, automatic measurement |
Excessive/too-small cross-section affects compression rate |
Appearance |
Visual, magnifier, automatic visual |
Cracks, bubbles, missing rubber, impurities, flash |
Hardness |
Shore A / IRHD |
Material state and batch consistency |
Tensile strength/elongation |
Test piece or protective specimen |
Judges base rubber material and length-retention capability |
Compression set |
Per customer or standard criteria |
Judges long-term sealing retention capability |
Specific gravity |
Density meter |
Judges formula deviation |
Media/aging resistance |
Oil, water, fuel, chemical, hot-air |
Verifies applicability applicability |
Cleanliness |
Particles, residue, ionic contamination |
High-cleanliness system requirement |
Defect |
Possible Source |
Risk |
Cracks |
Overcure, aging, demold damage, trim damage |
Leak and early failure |
Bubbles |
Mixing entrapped air, poor venting, volatiles |
Compression risk fracture |
Missing rubber |
Trim damage, demold damage |
Discontinuous sealing face |
Impurities |
Mixing contamination, environmental contamination |
Interferes with assembly |
Flash |
Mold, charge, or trim variance |
Sealing-face interference |
Pits/pockmarks |
Mold buildup, gas contamination |
Non-uniform sealing performance |
Color inconsistency |
Compound batch, contamination, aging |
Needs judgment on whether it's a performance abnormality |
Deformation |
Demold pulling, post-cure stacking, oversized package pressure |
Assembly poor fit |
One of the concerns most focused on by customers and auditors is: if a customer gets an O-ring, can the factory reversely trace which batch, which raw material, which mold, which equipment, which day it was produced, which QC person, and who else received this same batch?
More mature sealing-part companies assign each mixing batch a unique batch number, and let that batch number run through mixing, molding, and packaging; in a public case, James Walker describes each mixed compound being marked with a unique batch number that follows through the production process up to packaging, tracing back to the mixing, compression molding and constituent raw materials of that specific batch; another rubber composite material supplier notes its industrial production process is under ISO 9001/14001 system control, and has complete traceability of raw materials to finished products.
Level |
Traceability Content |
Customer order |
Customer name, PO, product number, drawing version, spec |
Finished-product batch |
Production date, quantity, packaging label, inspection status |
Molding batch |
Machine number, mold number, operator, shift |
Curing record |
Temperature, pressure, time, cycle, first-article confirmation |
Pre-form record |
Compound batch, blank weight, cutting personnel |
Mixing batch |
Production date, small material, curative, supplier batch |
Inspection record |
Incoming, compound, first article, patrol, final inspection, performance report |
Post-cure record |
Oven number, temperature curve, time, batch isolation |
Packaging record |
Standard, quantity, batch, COC/COA, shipping date |
The most effective audit method is "randomly sample a bag of finished product, reverse trace": read the finished-product batch number from the packaging label; check the final inspection report, look at dimension, appearance, hardness, AQL or full inspection result; check the production record, look at production date, machine number, mold number, curing parameters; check which compound batch was used for that batch; check mixing records, weighing records, MDR/Mooney/specific gravity/hardness; check raw material batch and COA; check post-cure, cleaning and packaging records; check anomaly records, was there rework, re-processing, concession acceptance or scrap; check the same-batch shipment scope, can it isolate stock and customers.
Only completing this chain proves an effective traceability system; if only the final inspection report can be provided but it cannot be traced back to mixing and raw materials, it indicates traceability capability is incomplete.

Welcome to HOVOO, a Chinese seal factory. Production of PU, Rubber and PTFE seals. The seals include O-ring, piston seal, rod seal, Gray ring and gas seal.


 EN
EN
 AR
AR CS
CS DA
DA NL
NL FI
FI FR
FR DE
DE EL
EL IT
IT JA
JA KO
KO NO
NO PL
PL PT
PT RO
RO RU
RU ES
ES SV
SV TL
TL IW
IW ID
ID LV
LV SR
SR SK
SK VI
VI HU
HU MT
MT TH
TH TR
TR FA
FA MS
MS GA
GA CY
CY IS
IS KA
KA UR
UR LA
LA TA
TA MY
MY
